FreeNAS v9.3 and ESXi 5.0 iSCSI data transfer testing

Had a little bit of time to do some testing using FreeNAS v9.3 and ESXi 5.0.

A little bit of background: 
FreeNAS is composed of a pair of Hitachi 1tb 7200rpm, SATA 3gbps driives, in a ZFS Mirror.  The network cards used are the onboard Realteks for iSCSI, and a 32bit PCI Realtek for managemnet.

ESXi server has two Intel PCI-X network cards dedicated to iSCSI

Both machines are connected to an HP Procurve switch, with a VLAN for dedicated iSCSI traffic.

The VM used for testing is a W2k8r2 machine that has data volume VMDK located on the FreeNAS.

First test: Single iSCSI link on the FreeNAS, VMware pathing is set to MRU.


 Just a chart showing the data transfer to both drive in the RAID set.

A chart showing the data transfer across the NICs, the one circled in red is the one dedicated for iSCSI traffic.


Second test: Single iSCSI link on the FreeNAS; VMware pathing set to Round Robbin.  Notice it is WAY slower than MRU.  
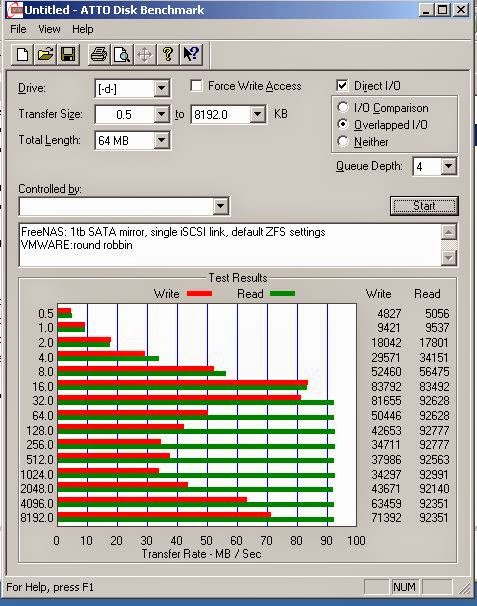

Third test: dual iSCSI links on the FreeNAS; VMware pathing set to Round Robbin.  The results were not much different, that MRU.  

This chart shows that both NICs are doing SOME data transfer.

Observations, questions, theories??!?!
I may have hit the ceiling on the transfer rate of the RAID1 SATA drives.  It is possible that they cannot simply go any faster, and adding a 2nd NIC into the mix just isn't going to help.   Also since all the load is being sent from a single VM from a single iSCSI server there isn't enough items hitting the NAS to take advantage of MPIO.  The Realtek NICs are well, junk (that is even noted some of the FreeNAS documentation), would an enterprise NIC be any better?  Ideally I would have two separate NICs taking the work load on instead of a "dual port NIC".


ESXi 5.0 & FreeNAS 9.3 MPIO iSCSI setup

Here are a few notes and steps I took to get true fail over an mutli-pathing set up in my home lab.

First of all, VMware does not like LACP, I am not going debate the LCAP vs MPIO here....just know that MPIO is better for iSCSI, and it doesn't require messing around with a switch.

One item that confuses me is the the way FreeNAS approaches this.  Actually I guess it is a FreeBSD kernel thing.  On a "normal" SAN a "group IP" is given to where all iSCSI initiators are pointed to, and each NIC on the SAN has its own IP, but the only one that really matters is the Group IP.  On FreeNAS, one has to set up an iSCSI Portal, which is just an item saying hey: "listen for iSCSI traffic on these IPs."  Each NIC on the FreeNAS has its own IP, but they have to be in "non-overlapping" subnets!  Why?!?  Not a big deal, but in order to get both of iSCSI NICs on my ESX host to talk to both iSCSI NICs on the FreeNAS I set the subnets to 255.255.254.0


OSI model

Sorry...had to re-post this!  :)  I am told that "Layer 8" is first mentioned in one of the beginning Cisco training manuals.

FreeNAS 9.2x to 9.3x upgrade

FreeNAS recently released a major update.  Since I am only using mine for backups, I had no fear in just blindly going for it!  First step was to download the UPGRADE file from Freenas.org, then go into my FreeNAS and choose "update firmware."  I choose to download a backup configuration file before hand.  The upgrade files are stored on the FreeNAS unit, as I boot off of an 8gb USB thumb drive, I choose to store the files on the only data store.  Several reboots and roughly 10 minutes later, the system was back up.

One item of note, is that v9.3 does NOT support UFS!  My first build I ran UFS as I am using a lowly Celeron CPU and I originally started out with only 4gb of ram.  After the upgrade, I had no storage!  What made it interesting is that I could just reformat the 2nd hard drive and create a new volume set.  I could not with the 1st hard drive; it gave errors about permissions of the GPT.  What I did to remedy it was to low-leveling the 1st disk using a 3rd party application.

Now I had to re-setup my CIFS share and iSCSI targets, no big deal, but annoying.  The iSCSI settings where there, I just had to repoint the extent to its new location.

VMware Physical to Virtual conversion notes....

-Speed up the transfer process by roughly 25% by disabling SSL.
Edit the Converter-worker.xml file, usually found here:
C:\ProgramData\VMware\VMware vCenter Converter Standalone
Look for the section "<NFC>", and change the "<UseSSL> to false, save, restart . VMware vCenter Converter Standalone Worker service.

http://kb.vmware.com/selfservice/microsites/search.dolanguage=en_US&cmd=displayKC&externalId=2020517

-Sometimes doing conversions from a single machine will fail, but will work if one installs the Stand Alone Converter software directly on the machine to be converted.

-Virtual Disk Service/Volume Shadow Copy/Microsoft software shadow copy provider are all services that should be set to automatic.

-The newest converter to work Windows Server 2000 that I found was version 4.1.

-Many failures are due to corrupt files, usually a check-disk will take care of it.

-Items like a bad drive, dead RAID cache battery, or 100Mbps network connections will dramatically slow the conversion down.

-Obtain/create batch files to do routine tasks.

-Do yourself a favor and do a hard drive clean up before the conversion.  Shutdown as much as possible before the conversion.  Anti-Virus, and databases, or anything that takes up I/O or has open files is best stop.

-Using the Synchronization features works great machines where up-time is an issue.  Do a first pass with the "Synchronize changes" box marked.  I have yet to see any impact to the server by doing this, short of it being a tiny bit slower.  Once it is done, DO NOT manipulate the VM!  When ready to make the last pass, mark the "Perform final synchronization" box.


Synology Backups.....

One of the most popular uses for a NAS is a place to store backups (Tape is dead!  Remember?) So now that the backups exist on <insert favorite NAS device>, how does one get that data off site?

Synology will back up to another CIFS share, RSYNC, or another Synology.

Using two virtual Synology devices I tested using one as a source and a 2nd as the destination.

Backing up a LUN (what Synology calls a "LUN Backup Set") , yielded a bunch of 4gb volumes.  I have yet to figure out if it is doing block level backups or not.  For instance, let's say one has a virtual machine living on an iSCSI LUN, if only a small amount of data is changed, how much is going to be backed up?  The entire VM?   The Entire volume?


If they Synology has a CIFS share, and that is told to backup (what Synology calls a "Network Backup Set"), it makes an exact copy on the receive box.  So that means no compression or no historical backups.

Two things really disappoint me.  The first being the logs and notifications.  All the information one gets is if the job completed or not.  No mention of the amount of changed data, time consumed, nothing!

Restoring: I haven't tried restoring the iSCSI volume yet.  However the CIFS share, it does a full restore of the entire volume!  One cannot pick and choose files or folders to restore.  The work around there, is to browse to the destination Synology and manually copy off the missing/corrupt data.  During my test I simply deleted a chunk of folders from source NAS, did a restore.  Surprisingly, it does only copy back the missing data, not the entire data set, as can be seen at on the progress meter.

Use a Synology NAS on physical hardware or as a VM!

The Synology DiskStation is written using the GPL licensing scheme, therefore it is open to third parties to manipulate and do feature adds.  Some people have ported the OS to run on most physical hardware and as a Virtual Machine.  The version emulates a DS3612xs, which is Synology's big boy 12 bay chassis.

I do like the Synology, it is one of the few entry level NAS's on the market to actually be on the VMware Hardware Compatibility List.  The App Store approach for plugins works well, and has some nice features.

I am not sure I would run this for production.  It MIGHT be easier to deal with than a FreeNAS or Openfiler.  It is however GREAT for learning about the product, and related items such as RSYNC, iSCSI, NFS, Media streaming servers, ect.

Here is the main site:
http://www.xpenology.nl/

Here are the instructions I followed:
http://patrickscholten.com/install-synology-dsm-esxi-5-x-virtual-machine/

Summarized install instructions for VMware ESXi:
-create a new custom VM using Linux 2.6 x64, 2gb ram, 1 cpu, use VMXnet3 nics, the data drive will be of type scsi.
-Upload the 32mb VMDK (and it's descriptor file) that has the ported DSM image on it, add it to the VM using disk type IDE

A few observations:
-Just like all Synology devices, one must have a DHCP server, else one cannot configure it, as they don't come preprogrammed with a static IP.
-Use the Synology Assistant to find the new device; as much as I hate installing extra apps on a PC, it is easier than doing an IP scan or looking through the DHCP server to find the device, and remembering to use http://ip.address:5000
-The device will alert you to new updates, but it will not apply them.  I assume it has to do with them not being ported.
-The app store works!
-I haven't attempted to load VMware tools.
-It detected my locally attached storage as type SSD, and my Xeon 54xx cpu's as Core i3's, no issues, just interesting.
-iSCSI does work.  Using a virtual DiskStation I was able to attach to it as an iSCSI target from the host ESXi machine.

hard drive benchmarks.....v1.2

More not super scientific benchmarking...

Dell PE2900, Perc 6i, 15k 146gb SAS * 8 drives RAID5

Dell PE2900, Perc 6i, 15k 146gb SAS * 4 drives RAID5
Interesting how little difference between 4 drives and 8 drives is.

Dell PE2900 on board SATA port to Hitachi 7200rpm 1tb drive.

Dell PE2900 on board SATA port to Intel 160gb SSD drive.
Interesting that write speed is about the same as the spinning drive, and writes are just over twice, but still can't compete w/ the 15k SAS drives RAID.  Is this a result of a poor SATA controller?

Openfiler, Optiplex 755, 750gb SATA 7.2k  iSCSI

Openfiler, Optiplex 755 1tb *2 SATA 7.2k RAID1 iSCSI


HP DL380, P410 w/ 512mb, 146gb 10k SAS *7 RAID5
I have no idea why the HP is falling on its face when it comes to read at 1mb.


Lenovo i5w/ 256gb mSATA

Dell Precision T5400 Sandisk 24gb mSATA on a mSATA to SATA adapter

Dell Precision T5400, Seagate 1tb Hybrid drive


Dell Laditude e6500, on Seagate Hybrid 750gb.  This machine has always seemed a little bit of a slug, so who knows on this one.


also see my previous posts of bench marks:
http://jungle-it.blogspot.com/2013/08/hard-drive-benchmarksv11.html
and
http://jungle-it.blogspot.com/2013/03/hard-drive-benchmarks.html

Databases for hosting a VMware environment.

SQL Express 2008+
-limited to use a single cpu & 1gb ram (aka performance issues may occur)
-10gb database limit size; a ceiling may be hit, but thus far I cannot find any sizing guides from VMware
-VMware recommend maximum for this is 5 ESXi hosts and/or 50 VM’s

Work Abounds:
Option A:
-Install vCenter on standalone server with SQL Express
-VMware Update Manager, install it on vCenter or break out to separate server with separate SQL Express
-Install VMware View Composer on a standalone server with SQL Express
The idea being that  two or three different SQL Express installs to spread the load around.  Hopefully that 10gb size limit would not be reached.

Option B:
-Use vCenter Virtual Appliance: VMware says it is compatible, it supports 100 hosts & 3000 VMs.  There might be issues in upgrading infrastructure components down the road, IE will VCA be compatible w/ View Horizon 6.0?  And if not will the upgrade of VCA be straight forward and not a rip & replace?  This option saves a Windows license, saves a from the 10gb database limit, saves from not having to purchase a full copy of SQL.  This approach is also somewhat new territory, and hasn’t been widely implemented.  Lastly Update Manger does not function in VCA, the method is to install it on another Windows server, which again needs to talk to a database either SQL or SQL Express. 

Option C:
-Spend money!  Buy SQL standard and another Windows License.   Be sure to limit SQL to not use ALL of the ram and CPU, also set the recovery mode to simplified data recovery, unless one wants to deal with all the SQL log files.

VMware vSphere Replication, a quick overview

VMware's vSphere Replication (VR), is a good way to duplicate VM's from one host/datastore to another.

The appliance comes with vSphere Essentials Plus and above.

The VM's are duplicated on an individual basis.  Meaning, one can do things like having the critical server replicated every four hours, but less critical ones every 24 hours.

VR can replicate either in the same datacenter or across a WAN.  For my quick testing I replicated a VM from my lab cluster, to another physical ESXi server on the the same subnet but a different VMware Cluster.  This meant I only needed one Virtualcenter Server and one vSphere Replication Appliance.

VR is an appliance so it installs much like any other appliance in no time at all.  Configuring VR was just a matter of telling it what VirtualCenter server to talk to, where the source and destinations are.

Configuring a VM for replication is a simple right-click and six questions.

This is what the destination datastore looks like after a successful replication.  The replicated VM does not show up in the machine inventory.  When browsing the respective folder, one may notice there is not .vmx file so there is no option to add it to inventory and power on the VM.  In order to use the replicated machine go to Home, vSphere Replication, "Replication Server", click the VR server, then the Monitor tab.  Highlight the VM in question, and choose recover.
Here are the options presented during the restore process.  One can also see status of the replication on this screen shot.  

This scenario only works to recover the VM's to the recovery server, it will not restore the VMDK's back to the original server.  One would have to copy off the VMDK to another storage to get the VMDK back to its original location.    It could recover the VMDK back to its original location if both ESXi server had access to the same storage.  In my lab, direct attached storage was in use.

For more information: