FreeNAS v9.3 and ESXi 5.0 iSCSI data transfer testing

Had a little bit of time to do some testing using FreeNAS v9.3 and ESXi 5.0.

A little bit of background: 
FreeNAS is composed of a pair of Hitachi 1tb 7200rpm, SATA 3gbps driives, in a ZFS Mirror.  The network cards used are the onboard Realteks for iSCSI, and a 32bit PCI Realtek for managemnet.

ESXi server has two Intel PCI-X network cards dedicated to iSCSI

Both machines are connected to an HP Procurve switch, with a VLAN for dedicated iSCSI traffic.

The VM used for testing is a W2k8r2 machine that has data volume VMDK located on the FreeNAS.

First test: Single iSCSI link on the FreeNAS, VMware pathing is set to MRU.


 Just a chart showing the data transfer to both drive in the RAID set.

A chart showing the data transfer across the NICs, the one circled in red is the one dedicated for iSCSI traffic.


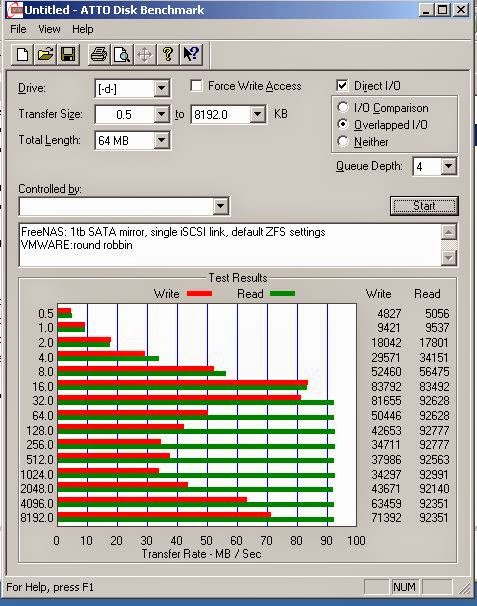
Second test: Single iSCSI link on the FreeNAS; VMware pathing set to Round Robbin.  Notice it is WAY slower than MRU.  


Third test: dual iSCSI links on the FreeNAS; VMware pathing set to Round Robbin.  The results were not much different, that MRU.  

This chart shows that both NICs are doing SOME data transfer.

Observations, questions, theories??!?!
I may have hit the ceiling on the transfer rate of the RAID1 SATA drives.  It is possible that they cannot simply go any faster, and adding a 2nd NIC into the mix just isn't going to help.   Also since all the load is being sent from a single VM from a single iSCSI server there isn't enough items hitting the NAS to take advantage of MPIO.  The Realtek NICs are well, junk (that is even noted some of the FreeNAS documentation), would an enterprise NIC be any better?  Ideally I would have two separate NICs taking the work load on instead of a "dual port NIC".


ESXi 5.0 & FreeNAS 9.3 MPIO iSCSI setup

Here are a few notes and steps I took to get true fail over an mutli-pathing set up in my home lab.

First of all, VMware does not like LACP, I am not going debate the LCAP vs MPIO here....just know that MPIO is better for iSCSI, and it doesn't require messing around with a switch.

One item that confuses me is the the way FreeNAS approaches this.  Actually I guess it is a FreeBSD kernel thing.  On a "normal" SAN a "group IP" is given to where all iSCSI initiators are pointed to, and each NIC on the SAN has its own IP, but the only one that really matters is the Group IP.  On FreeNAS, one has to set up an iSCSI Portal, which is just an item saying hey: "listen for iSCSI traffic on these IPs."  Each NIC on the FreeNAS has its own IP, but they have to be in "non-overlapping" subnets!  Why?!?  Not a big deal, but in order to get both of iSCSI NICs on my ESX host to talk to both iSCSI NICs on the FreeNAS I set the subnets to 255.255.254.0


OSI model

Sorry...had to re-post this!  :)  I am told that "Layer 8" is first mentioned in one of the beginning Cisco training manuals.

FreeNAS 9.2x to 9.3x upgrade

FreeNAS recently released a major update.  Since I am only using mine for backups, I had no fear in just blindly going for it!  First step was to download the UPGRADE file from Freenas.org, then go into my FreeNAS and choose "update firmware."  I choose to download a backup configuration file before hand.  The upgrade files are stored on the FreeNAS unit, as I boot off of an 8gb USB thumb drive, I choose to store the files on the only data store.  Several reboots and roughly 10 minutes later, the system was back up.

One item of note, is that v9.3 does NOT support UFS!  My first build I ran UFS as I am using a lowly Celeron CPU and I originally started out with only 4gb of ram.  After the upgrade, I had no storage!  What made it interesting is that I could just reformat the 2nd hard drive and create a new volume set.  I could not with the 1st hard drive; it gave errors about permissions of the GPT.  What I did to remedy it was to low-leveling the 1st disk using a 3rd party application.

Now I had to re-setup my CIFS share and iSCSI targets, no big deal, but annoying.  The iSCSI settings where there, I just had to repoint the extent to its new location.

VMware Physical to Virtual conversion notes....

-Speed up the transfer process by roughly 25% by disabling SSL.
Edit the Converter-worker.xml file, usually found here:
C:\ProgramData\VMware\VMware vCenter Converter Standalone
Look for the section "<NFC>", and change the "<UseSSL> to false, save, restart . VMware vCenter Converter Standalone Worker service.

http://kb.vmware.com/selfservice/microsites/search.dolanguage=en_US&cmd=displayKC&externalId=2020517

-Sometimes doing conversions from a single machine will fail, but will work if one installs the Stand Alone Converter software directly on the machine to be converted.

-Virtual Disk Service/Volume Shadow Copy/Microsoft software shadow copy provider are all services that should be set to automatic.

-The newest converter to work Windows Server 2000 that I found was version 4.1.

-Many failures are due to corrupt files, usually a check-disk will take care of it.

-Items like a bad drive, dead RAID cache battery, or 100Mbps network connections will dramatically slow the conversion down.

-Obtain/create batch files to do routine tasks.

-Do yourself a favor and do a hard drive clean up before the conversion.  Shutdown as much as possible before the conversion.  Anti-Virus, and databases, or anything that takes up I/O or has open files is best stop.

-Using the Synchronization features works great machines where up-time is an issue.  Do a first pass with the "Synchronize changes" box marked.  I have yet to see any impact to the server by doing this, short of it being a tiny bit slower.  Once it is done, DO NOT manipulate the VM!  When ready to make the last pass, mark the "Perform final synchronization" box.