10gb vs 25gb Ethernet when concerning electrical usage

Controlling the amount of electricity being used in computing use has become increasingly more important over the years.  Wither it is in the home lab, and the consumption directly affect one's own pocket book or the datacenter/server room has heating or power limitations. 

In this case I thought it might be interesting to look at what impact of networking speed has on electrical use. One could conclude from simply looking at number of and size of the heatsink on the cards that there must be a difference.  For this test my trusty Kill-A-Watt was pulled out of storage.  A normal desktop was used, a Dell 3rd Gen i3, the specifics are irrelevant.  Each time the machine was booted off of USB thumb drive into "Parted Magic" (a Linux Rescue Utility); I chose that OS over using Windows so other variables such as drive indexing or Windows Updates wouldn't skew the results. The machine was left to idle for 5 minutes to let things settle down before measurements where taken.  Extra GBICs where removed, and the same DAC cable was used.  The machine was plugged into a 10gb switch; no 25gb switch was available for testing, donations are welcome! :)

Bare machine: (no additional hardware) = 32watts

Machine w/ 10g Intel i520 NIC no cable =35watts

Machine w/ 10g Intel i520 NIC w/ cable =37watts

Machine w/ 25g Mellanox CX4 NIC no cable =40watts

Machine w/ 25g Mellanox CX4 NIC w/ cable =42watts

Machine w/ 25g Mellanox CX5 NIC w/ cable =41watts

Machine w/ 25g Broadcomm BCM51414 w/ cable =41watts

Machine w/ 25g Chelsio w/ cable =49watt (very hot to the touch!)

Intel on top, Mellanox CX4 on bottom.

Chelsio on top
Broadcom in the the middle
Mellanox CX5 on the bottom

Another future test would be to test under load.


Watchguard M270

 More electronic recycling.  This Watchguard M270 firewall, while is still supported and the latest code works on it, it was sent out for scrap!   So let's take a closer look at it.

This device had customer data on it, I didn't know the password, nor the IP scheme.  Next I attached to the console port, and rebooted it into the recovery mode, I didn't find a password reset option.  So a factory reset had to be done.

1. Power off the Firebox.

2. Press and hold the Reset button on the back of the Firebox.

3. While you continue to hold the Reset button, power on the Firebox.

4. Continue to press the Reset button until the Attn indicator begins to flash.

5. Release the Reset button. ...

6. Wait for the reset process to complete.

Once done, open a web browser to https://10.0.1.1:8080, use credentials admin & readwrite

Sadly the feature keys for this product are now gone. I didn't realize the reset would wipe them.  The box will not download it's key from the Watchguard mothership, it complains about being expired.  Now the box is pretty much useless as a Watchguard, as it will only allow one client to get through the network.  I have seen some people run PFsense on this hardware, so that could be an option.

Interesting observations:

-there is a way to get into the BIOS via the console cable, but no one seem to know the password.  There is a way to re-flash it. 

-CPU: Intel Atom C3558 @ 2.2ghz, 4 core, 4 threads, 16watt, BenchMark 2417

-Memory: 4gb RAM DDR3 sodimm

-Hard drive: 16gb mSATA

-Marvell 2.5gbps ports?  I saw mentioning of this during boot, but that might be an internal switch or something, as from the command line and the GUI all the ports report as 1Gpbs

-the power supply is a "wall wart"....the big plastic transformer/power supply is actually inside of the case, and the barrel plug fits into the system board.  Interesting!  I guess it makes replacement simpler, and from installation point of view I'd rather rack a full width appliance vs. a smaller one and then have to deal with securing the external transformer/power supply somewhere else in the rack.


Dell PowerEdge r620 TrueNAS Build: part 2

 Finally getting around to this project again.   

TrueNAS Core 13.05 was installed onto the 64gb SSD drive.  The eight Evo 840 1tb drives were set up into two groups of four RAIDz2 pools, then mirrored.  The drives have a lot of hours on them, so I could arrange them better IOPs or space, but I am going error on the side of caution here and go for higher resiliency.  The usable space is around 3.5tb.

 One of the 1gb cards was setup with a static IP address.  The Mellanox 40gb card was setup with a different IP arrange.  The rack that this system will live in has a Dell Force10 switch that has six 40gb ports (two of setup in a trunk for uplink) and forty-eight 10gb ports, there also is a separate 1gb switch. 

Then iSCSI service was started, bound to the 40gb interface.  A zPool, portal, target, and extents were setup.  For the meantime a Dell r730 running VMware ESXi v7.x with a single 10gb interface was setup for iSCSI.  The connections was made, the datastore presented.  Storage vMotion a Windows11 VM to the TrueNAS, and ran Atto Disk Benchmark.


Using 10gb networking, this is faster than my twenty drive SAS 7200rpm system.

Using 40gb networking, there is some gains to be had.  It appears that the system is being held back by 10gb networking.


Dell PowerEdge r620 TrueNAS Build: part 1

I have eight Samsung Evo 940 SSD 1tb drives that needed a deserving home; so I decided to build  another TrueNAS to server as a VMware shared storage appliance.  A Dell PowerEdge r620 server was picked out a to use, as it had eight 2.5" drive bays.  The dual CPU's e5-2650's should be way more horse power needed to be an ISCSI/NFS target.  Eventually they will be upgraded to v2 CPU's as they are stupid cheap on eBay and it is roughly 30% more performance with no extra electricity. 

An Intel 64gb SSD was brought out of retirement, installed into a slim-CDROM to 2.5" HDD adapter. This would be where the OS will be installed.  However first, I installed Windows Server to it just to test out the hardware and then update the firmware.  

First issue I ran into is that even though this server has eight 2.5" drive bays, the backplane only had four drive connectors!  I have seen other r620's with only four drive bays, but the other side was a metal face, this one had drive sled in it!  Interesting!   As luck would have it I found another r620, that had a backplane that did have all 8 drive connectors but was only two hard drives, so the back plane got swapped.  


This server has a Perc H710 mini monolithic RAID card with 512mb of battery backed cache.  TrueNAS works much better using an actual hard drive controller, not a RAID card where the OS officiates the disk info.  It appears that the r710 does not support non-RAID-ed disks.  I attempted to pull out the RAID card, to see if the machine would see the drives; it would not.  On a previous build (a Dell r320) I removed the RAID card moved the cable to to a different mini-SAS-8087 36 pin connector, thus the system ran the drives off of the onboard SATA controller.  This Perc H710 uses a SAS-8654 cable?  I didn't have a one into two SAS sas-8087 to go from the single onboard connector to the two back plane connectors.

Well, time to gamble a bit and attempt to flash the Perc into "IT-mode"...basically re-writing the firmware to make it think it is a some sort of LSI 2208 series SAS HBA controller.  The H710 does have a faster processor than H310, and with spinning disk one probably would not max out the controller; with SSD's getting to that ceiling is a real possibility.  It turns out there is not one but two different versions of the H710, one is PCI-e 2.0 vs 3.0 "capable".   If one searches the web for great resource: "Art of the Server", he has lots of great information on these.
Following the steps here on Jon Fohdeesha's site the BIOS changes were made.  The RAID battery removed, the drives removed, the ROM on the Perc was erased, via the FreeDOS utility, although I did erase it three times as it would error out on the 2nd step. The new firmware was then written, the SAS identifier reprogramed.  All was successful!  During post, one now sees the LSI/Avago BIOS and menu screen.  Also interesting is that the Dell "System setup" also see the HBA.


TrueNAS & NFS (sync vs async vs sync w/ zLOG)


Another TrueNAS (core v13.0) build!  This one is mostly just a backup repository....or as I call them: "here, hold this, server".  This is a SuperMicro SM SGG-6029p-e1cr24l....which is a pretty crazy server that in a 2U configuration holds twenty-four 3.5" hard drives!  Plus rear mounted two 2.5" hard drives.  This one has dual Xeon 3104 CPU's at 1.7ghz, 64gb DDR4 ECC ram, a 64 SATA DOM, two Intel 480gb SSD's and soon to be 24 (currently only 22 are in service, the other two are out for warranty) Seagate 8tb 7200rpm SATA drives, driven by a SAS 9305-16i-IT controller.  Network connections are the onboard 1gbps NIC which is shared for IMPI and Network (which is giving me grief, but won't go into that now) and a dual port 10gb NIC.

TrueNAS was installed onto the 64gb SSD DOM (Disk On Motherboard); yes certain people will get all bent out of shape about this.  Yes the DOM has a limited lifespan, it could die as the endurance isn't as high as a normal SSD.  We also don't have mirrored drives for the boot OS.  Well, you know what?  I don't care!  TrueNAS doesn't really write that much to the boot volume, especially if since most of the OS is copied to RAM.  If the drive fails, just reinstall TrueNAS, import the config file.  Plus this is just an additional backup target, if it goes down for a day or so, no big deal.

The data volume was created with five groups of four drives in a ZFS RAIDz2.  So basically a twenty drive RAID 10.  NFS v3 was setup, and presented to a VMware host.  A Windows 10 VM was migrated to it and the ATTO Disk Benchmark was ran. 

This first the first test, but notice the frankly unacceptable write speed?  NFS has what is commonly referred to as "synchronous writes" turned on by default.  In short, the each disk write must be confirmed to be written to disk before continuing.  This options can be turned off, however there is a risk.  In the event of power loss or other disaster the data in cache might not be written, and therefore lost.

sync or async options can be set at the dataset level.

Same test with sync turned off; much better.

For this test sync was turned back on and NVMe drive was added and configured to be zLOG vDev.  Essentially a write cache buffer.  ZFS/TrueNAS will flush the log device every 5 seconds, and with a 10Gbps NIC, doing back of the napkin math that means the system will only use about 6gb of space......yes only 6gb, so the 512gb NVMe is largely being unused.  TrueNAS requires an entire disk to be allocated.  So this would be a great use case for NVMe name spaces.  


There is NO benefit of running a zLOG on a pool that has Sync turned off.


SuperMicro BigTwin SSG-2029-DN2R24L...and VMware ESXi Part#2

 Decided to do a little bit of network benchmarking. 

Both nodes have a VM setup on them, both VMs live on NVMe.

First test is both VMs talking to each other over the built in 10gb NICs.  In the part #1 it was mentioned that this server has network backplane for the two nodes to communicate, using Intel 10gb NIC hardware.


Second test is both VMs talking to each other using a virtual switch that has a 100mb NIC.

Third test is both VMs talking to each other using a virtual switch has a 10mb NIC.

Fourth test: just add some perspective.  This is two VM's each running on HP ML350's G8's connected via 10gb NICs on a really old Broadcomm switch.


SuperMicro BigTwin SSG-2029-DN2R24L...and VMware ESXi Part#1


This 2U server holds two compute nodes and has a shared backplane to 24 U.2 dual path NVMe drives.


Each compute node has a X11DSN-ts motherboard, containing a M.2 slot, twelve DDR4 memory slots, dual LGA-3647 sockets (this one has Xeon Gold 6140 CPU's).  For networking they have two Intel 1gb/10gb RJ45 NICs plus two more Intel 10gb NICs that are strictly node-to-node communication.


This system poses some questions.  How will VMware react to have having two hosts accessing the very same hard drives?  Is VM failover possible with out vCenter?  What will vCenter think about the shared datastore?  How will storage vMotion work?  And what about those internal NICs?   

ESXi 7 was installed onto the onboard M.2 NVMe drive.  Virtual switches were setup, one for the added in PCI-e 100gb NICs, one for the two onboard 1/10gb NICs, and a third for the two internal NICs (the ones for node-to-node communication).  A single VM was created on each host, and connected to the internal switch.  It was confirmed that a VM on host-A could communicate to a VM on host-B.

A datastore was created using one of the U.2 NVMe drives on host-A.  Host-B didn't pick up this datastore until after a reboot.  I am sure there is someway of refreshing how ESXi scans for new/existing datastores that are local.  Additional disks to the datastore were added as an extent on host A.  Host B automatically picked up the size increase, without having to reboot.

A VM on host-A was stood up; host-B could not register that VM until it was shutdown. After registering the VM on host B, host A did not seem to care or know anything was different, other than it still showed the VM as powered off.  Rebooting host A shows those VMs as invalid.  VMware file locking is taking affect in the background.  After shutting down the VM, waiting a few minutes, refreshing the screen, that VM could not be powered on; on host-A.  It appears the only way to bring the VM back to the original host is to unregister the VM and register it.


HP Smart Array p420 RAID card notes

 A couple of quick notes...

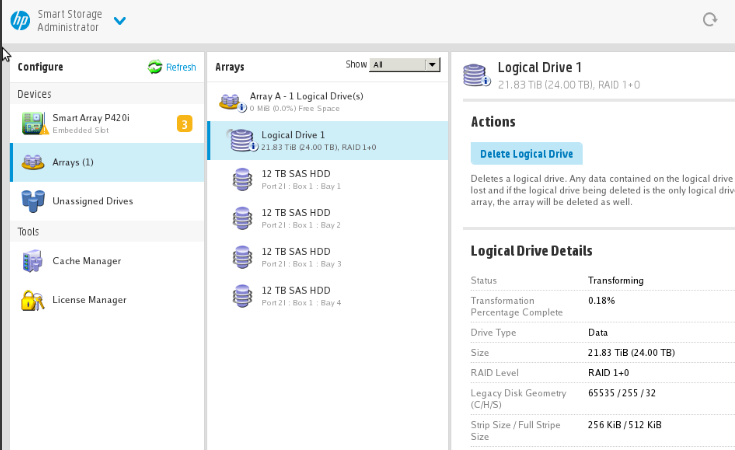
The controller WILL support larger than 4tb drives.  I have used both Seagate ST6000nm0034 6tb drives and Seagate Exos 12tb SAS drives.

The ROM utility will misreport the drives, but do not worry.


ILO however will see the drive correctly.

HP Storage Administrator also reports the drives correctly.


If for some reason one needs to re-order the drives; the RAID card will figure it out.  The RAID card will notify one that on boot that the drive order was changed and has been corrected.  In my case I was originally running 3.5" drives bolted into the case, and not in the drive cage.  Through a bunch of trades/migration I was able to acquire a drive cage.  Somehow despite taking notes of the drive position on the SAS break out cable and matching that to the drive cage, it still wasn't correct. 


Dealing with large drives can be a PAIN!  This is in now way unique to HP, but when one modifies the RAID structure, or has a drive failure; doing all the recalculation takes forever.  In my case, migrating a RAID1 (mirror) of two12tb 7200rpm SAS drives to a three drive RAID5, took over 24hours, and that was just the 1st step.  That is correct, there is two steps, one must first recalculate the array, then another recalculation for Logical drive, which also takes forever and a day.   So this is another reason why it might be better to buy more drives of a smaller size vs. fewer and larger drives.  Also keep in mind the type of RAID one is using, RAID-5 will take more processing than RAID-10 and RAID-1.  RAID 6 is also deserves a good look at, where available. 


NVMe namespace notes:

 Just a bunch of notes for my future self, as I am sure I will forget, and for anyone else who may benefit. 

What is a namespace?  Think of it just like a partition on a normal hard drive.  Except the partitioning of the drive is done at the hard drive level not at the operating system level.  Thus the operating system sees the name spaces as unique hard drives.  IE if one had a 1tb NVMe, and setup four 256gb name spaces, Windows would think there was four 256gb NVMe drives in the system.  

FROM LINUX (PartedMagic was used):

nvme list <--show what nvme name spaces are present and the model of the drive

nvme id-ctrl /dev/nvme0 | grep mcap <--shows" tnvmcap (total NVM capacity) and unvmcap (unallocated NVM capacity) attributes.

nvme id-ctrl /dev/nvme0 | grep cntlid <--show the controller(s) ID's


DELETE NAMENSPACES

nvme detach-ns /dev/nvme0 –n 1 –c 0 <-- detaches the namespace "1" from the controller "0" 

    sometimes using the flag --controllers=0 is necessary

nvme delete-ns /dev/nvme0 -n 1 <--deletes the namespace "1" from the controller "0"

nvme ns-rescan /dev/nvme0 <--rescans the drive "0"


CREATE NAMESPACES

nvme create-ns /dev/nvme0 -s 26214387 -c 26214387 -b 4096  <--creates a 100gb name space, formatted to 4k

nvme ns-rescan /dev/nvme0 <--rescan
 

nvme attach-ns /dev/nvme0 -n 1 -c 0x1  <--attach the namespace to the controller
 

nvme ns-rescan /dev/nvme0  <--rescan


Ignore this stuff....just notes to me...

nvme detach-ns /dev/nvme0 -n 1 -c 6

    detaches namespace 1 from nvme0 from controller 6

nvme delete-ns -n 1 /dev/nvme0

    deletes namespace1 from nvme0

nvme create-ns /dev/nvme0 -s 15,000,000,000 -b 512

    creates a namespace of 7.86tb w/ 512 sector size

nvme attach-ns /dev/nvme0 -n 1 -c 6

    attaches namespace 1 to controller 6 on nvme0

size:

size in mb...IE 7.68tb =7,680,000,000,000

take that number dived by 4096 or 512, if there is a remainder, subtract the remainder from the original size, and divide again.

7,680,000,000,000/512=15,000,000,000


NVMe U.2 drives in machines with out U.2 backplanes

 I just discovered these and figured it worth the share.

NVMe drives that are in 2.5" hard drive form factor (versus the more familiar M.2 "gum stick" variety), look just like a normal SAS hard drive.  However the pinout is slightly different, and one needs to have different backplane and connections to the PCIe bus than SAS.  IE one can not take a server physically configured for SAS/SATA drives and utilize these U.2 drives. 

This is where this adapter comes in.  Mount the drive to the PCIe card, plug the card into the computer, and one can now utilize that hard drive.  Another feature of this specific card is one could use a normal 2.5" SATA hard drive on this card as well.  One just needs to feed a SATA cable to the card.  Both are very handy options to for instance adding a single 2.5" drive to a machine that is doesn't have any extra drive bays, or the bays are configured for 3.5".